


MAINTENANCE
Any work on mechanical parts and the electrical system must be carried out by fully qualified
personnel.
Under normal working conditions, IPSO ironers require a minimum of maintenance. To ensure less friction on the
items during the ironing process and to keep the chromed surface of the ironing plate clean, it is advisable the
user uses daily "G-SIL", a special product for roller ironing which replaces wax. Spray evenly onto the roller as it
rotates. Useful tip spray from under the feed-in wooden table with the ironing plate under pressure and slightly
heated (80-90°C). Use the spray as and when necessary.
Operations carried out by professionally qualified personnel: make sure that the ironed is disconnected from the
mains before carrying out maintenance. The mechanical moving parts require weekly lubrication. The reduction
gears are self-lubricating and do not require maintenance.
The surface of the roller must be checked weekly to ensure that it is smooth and even along its whole length. Any
worn areas can be re-padded with steel wool or the external covering can be replaced.
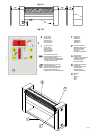
ORIGINAL SPARE PARTS
The original spare parts are specially made to fulfil our requirements regarding their manufacture, correspondence
to the original components and materials used and are therefore ideal for our ironers.
To order spare parts, provide the following details:
1) the name of the machine - see data on the rathing plate -
2) the serial number - see data on the rathing plate -
3) the code of spare part - see spare parts list -
4) the quantity required.
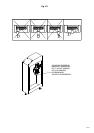
REPLACING THE ROLLER COVERING
1. Remove the cover sheet and flannel. Wind off the steelwool, completely exposing the roller.
2. Take a new roll of steelwool, cut one and off diagonally and place on the left-hand side of the roller with a
slope of approx. 30 degrees. Keep tight.
3. Begin winding towards the right-hand end with the ironing plate under pressure, taking care not to overlap the
edges; then take a second layer from right to left in the same way. Repeat this operation until the
circumference of the roller reaches 770 mm.
4. Spread the flannel evenly over the padded roller and tighten with the ironing plate under pressure until it is
fully wound. Raise the temperature to approx. 130°C and let the roller rotate for a few minutes until the
flannel cover is settled.
5. Place the narrowest end of the cover sheet approx. 10 cm under the edge of the flannel, making sure it is
perfectly smooth and parallel. Put the ironing plate under pressure and wind the sheet round. Let the roller
rotate for a few minutes. When the cover sheet is settled, secure the ends.
Every maintenance operation must be carried out by professionally qualified personnel.
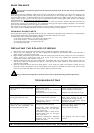
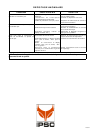
TROUBLESHOOTING
TROUBLE POSSIBLE CAUSE REMEDY
Upon switching on the ironer does
not work.
Mains power failure.
Magnetothermal switch
intervention.
Card protection fuse (F4) blown.
Check if supply terminals are live.
Check dispersion toward earth.
Replace fuse and check for cause.
The roller does not turn and the
ironing plate does not drop.
Motor fuse (F3) blown.
Motor thermal feeler activated.
Emergency devices activated
(display shows “Err”.)
Replace fuse and check for cause.
Wait some minutes for the re-
establishment of feeler contact.
Disactivate the emergency device
and press the pedal.
After adjusting the temperature by
means of the thermostat, the
ironing plate does not heat.
Safety thermostat activated.
Thermostat probe disconnected:
display shows “Er1” for the right,
“Er3” for the left.
Thermostat probe in short circuit:
display shows “Er2” for the right,
“Er4” for the left.
Measured temperature difference
between right and left probes
higher than 40°C.
Reset the safety thermostat using
the relative push button.
Check probes connection.
Use properly the whole ironing
surface.
N.B.: All checks and any technical work must be carried out by fully competent, qualified personnel.
14/37