


OPERATING INSTRUCTIONS (CONT.) OPERATING INSTRUCTIONS (CONT.)
4. Turn the temperature dial to any of
the temperatures within the gray
steam band and allow the iron to
heat for approximately 2 minutes
before ironing. Place iron on its
heel (on a stable, protected
surface) while the iron is warming to
desired temperature.
5. Slide the steam lever up to increase
the amount of steam. When using
extra steam, the iron uses more
water and it may be necessary to fill
the tank more often. See page 4.
0
For Steam Ironing:
5
BURST OF STEAM
WARNING!
DO NOT aim iron at face,
towards yourself, or anyone else
while using or adjusting steam.
Burns or serious injury may occur.
The burst-of-steam button is useful
when ironing denim, cotton, and linens.
It provides extra, sudden blasts of
steam which aid in removing stubborn
wrinkles.
The burst-of-steam feature can be used
with Dry or Steam ironing as desired.
1. Make sure the water tank is at least
1/2 filled with water.
NOTE: If the tank runs dry, remove the
plug from wall outlet. Then, fill the iron
with water and re-prime the pump. The
iron may be filled with water while it is
hot.
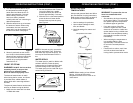
WATER SPRAY
The water spray is useful on fabrics with
stubborn wrinkles. Press the spray
button and a jet of water will spray onto
the fabric being ironed. See Figure 5.
The water spray can be used with dry or
steam ironing as desired.
Figure 3
2. Set the temperature dial. Place the
iron on the stand (on a stable,
protected surface) and allow it to
heat for approximately 2 minutes.
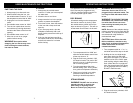
3. With the iron in a horizontal position,
press the burst of steam button
several times to prime the pump.
See Figure 4.
Figure 4
SELECTING IRON
TEMPERATURES
Always read garment labels and follow
the manufacturer’s ironing instructions.
Refer to the “Ironing Chart” on page 10
for temperature recommendations:
• Use low settings for synthetics.
•• Use moderate settings for wool,
silks, and blends.
••• Use high settings for cottons and
linens.
IRONING HINTS
WARNING!
To prevent fire, do not
leave iron unattended while
connected.
• Sort articles to be ironed according
to the type of fabric. This will reduce
the need to adjust the temperature
for different types of garments.
• If you are not sure of the fiber
content of a garment, test a small
area such as a seam or inside hem
section before ironing a visible area.
Start with a low temperature setting
and gradually increase to find the
best setting.
• When reducing the temperature to
iron sensitive fabrics, allow
approximately 2 minutes for the iron
to cool to the new temperature
setting.
• Fabrics such as velour, wool, linen
and silk are best ironed with an
ironing cloth to prevent shine marks.
Temperature Control Dial
Variable Steam Control
Figure 6
Figure 7
6. Steam is produced as soon as the
iron is held in the horizontal position.
Steam will stop coming out when the
iron is put on its heel in a vertical
position or by turning the steam
control dial to “0”.
Figure 5
NOTE: Before starting to iron delicate
fabrics, it is best to first test the
temperature of the iron on a hem or an
inside seam.
6