


2 1
3
4
1. BURST OF STEAM/X-TENDED
STEAM BURST
TM
BUTTON
Turn the button counter clockwise all
the way to the left for quick bursts of
steam to aid in removing stubborn
wrinkles from fabrics such as denim,
cotton or linen.
Turn the button clockwise all the
way to right to get prolonged bursts
of steam. The iron in the X-Tended
steam position can be used
vertically as well as horizontally.
STORAGE
1. Always turn the variable steam
control to “0” after you have emptied
the water tank.
2. Allow the iron to cool down.
3. Always store the iron in the upright
position to protect the soleplate.
4. From time to time, clean the exterior
of the iron with a damp cloth and
wipe dry.
5. If you use spray starch, wipe the
soleplate occasionally with a soft
damp cloth to prevent the build-up of
deposits.
6. If the iron has not been used for a
few weeks, hold the iron horizontally
and allow to steam for 2 minutes
before ironing.
NOTE: The anti drip function reduces
water dripping and water stains. It does
not prevent water dripping and water
stains if you press the steam burst
button too often or if the temperature is
too low. The amount of water droplets
will eventually decrease after the iron is
used for 2 to 3 tankfuls of steaming and
ironing.
IRONING HINTS
WARNING!
To prevent fire, do not
leave iron unattended while
connected.
• Sort articles to be ironed according
to the type of fabric. This will reduce
the need to adjust the temperature
for different types of garments.
• If you are not sure of the fiber
content of a garment, test fabric by
ironing a small area such as a seam
or inside hem section before ironing
a visible area. Start with a low
temperature setting and gradually
increase to find the best setting.
• When reducing the temperature to
iron sensitive fabrics, allow
approximately 2 minutes for the iron
to cool to the new temperature
setting.
• Fabrics such as velour, wool, linen
and silk are best ironed with an
ironing cloth to prevent shine marks.
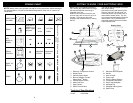
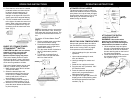
FEATURES OF INTELLIGENT ELECTRONIC IRON
OPERATING INSTRUCTIONS
LED Display Panel
7.
LED DISPLAY PANEL
Displays the fabric setting
(left) and the temperature
indicators (right).
2.
ATOMIZER SPRAY
BUTTON
Pressing this button provides a
defined jet of spray which gently
moistens fabric.
8.
WATER FILLING INLET
The cover prevents dust and
foreign matter from entering
the water tank. It also stops
any water from spilling during
ironing.
3.
VARIABLE STEAM
CONTROL
Minimum to maximum steaming for
different materials. Self cleaning
feature flushes internal sole plate
with water.
9.
STAINLESS STEEL
SOLEPLATE
Provides maximum glide-
ability and heat retention.
4.
ELECTRONIC
TEMPERATURE CONTROL
Select the fabric setting and
temperature indicator by
pressing on this button.
10
. EXTRA LARGE
ATTACHABLE SOLEPLATE
Provides additional surface area
for large ironing jobs.
11.
PIVOT CORD
For left or right handed use.
Pivots up and down;
prevents dragging along the
fabric. The flexible cord
protector protects the cord
from fraying.
5.
ANTI-DRIP FUNCTION
Cuts off water when the
iron temperature is too low.
6.
BUILT-IN ANTI-CALCIUM
FILTER
Prevents calcium build-up and
prolongs the life of the iron.
8
3