3. Create the profile set directory. For example:
# mkdir engineering
4. Go to the newly created directory to ensure that the necessary files are
copied to the correct destination. For example:
# cd engineering
5. Copy the CDFs, any user-supplied files, and all other related files from
your working area to the new
engineering profile set directory using a
copy tool such as cp, ftp,orrcp.
For example, if your CDFs and user-supplied files are in the
/users/dev/working directory on the same system:
# cp /users/dev/working/install.cdf .
# cp /users/dev/working/config.cdf .
# cp /users/dev/working/preinstall .
# cp /users/dev/working/update_preinstall .
# cp /users/dev/working/postload .
# cp /users/dev/working/update_postload .
# cp /users/dev/working/postreboot .
6. Use the chmod command to ensure that all files have execute
permission:
# chmod 755 *
7.3 Registering Clients for Profile Sets
After you copy CDFs and other files to the profile set directory, you can
register RIS clients for cloning or for user-supplied file invocation during a
full RIS installation. You do this by registering new clients to a profile set as
well as to a RIS environment.
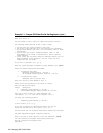
In Example 7–1, you have established profile sets for client workstations
in different departments. You are registering the client pubs08 for the
operating system in the RIS area ris0.alpha and for the profile set
techpubs.
Example 7–1: Sample RIS Client Profile Set Registration
# /usr/sbin/ris
*** RIS Utility Main Menu ***
a) ADD a client
d) DELETE software products
i) INSTALL software products
l) LIST registered clients
m) MODIFY a client
r) REMOVE a client
s) SHOW software products in remote installation environments
x) EXIT
Managing RIS Profile Sets 7–3


