


Page 9
1. Shut off main gas supply and electrical power. Disconnect
bonnet gas supply line at union fitting.
2. Unscrew two (2) top front cover panel hold down screws and
open front cover panel. If wires enclosed are not color coded
or number matched, match mark before disconnecting or
removing.
3. In the left hand control box, disconnect the two (2) multi-wire
connector plugs. Unscrew two (2) hold down bolts from the
bottom of the box and one (1) bolt outside the rear of the box.
Remove the two (2) screws that hold the conduit plate to the
control box. Now remove the box.
4. In the right hand control box, unscrew one (1) screw at the
top of the control panel and swing panel forward. Disconnect
two (2) multi-wire connector plugs. Unscrew two (2) hold
down bolts from bottom of box and one (1) bolt outside the
box at the rear.
5. Replace two (2) top front cover panel hold down screws and
remove entire control panel assembly.
6. Disconnect exhaust duct at bonnet enclosure assembly. (Only
applies to energy-saver models “F” and “R”.)
7. Unscrew hold down screws from bonnet enclosure assembly
(energy-saver models only). Unscrew bonnet hold down
bolts. Remove air switch box cover on rear of dryer,
disconnect one (1) yellow wire from air switch, one (1)
black wire at cigarette connector and remove one (1) conduit
nut. The entire bonnet and enclosure assembly can now be
removed from top of dryer.
8. To reassemble, reverse disassembly procedure.
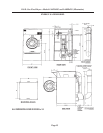
Disassembling Top of Dryer
PROCEDURE FOR
DISASSEMBLING TOP OF
110 LB. GAS LAUNDRY
DRYERS