


2 3
Our products are engineered to meet the
highest standards of quality, functionality
and design. We hope you thoroughly enjoy
your new Braun steam iron.
Important Safeguards
• Read all instructions carefully before using the iron. Keep the use instructions during the
entire life of the iron.
• Before filling with water, always disconnect the plug from the socket first.
• Always pull the plug and not the cord.
• Electric irons reach high temperatures during operation that could lead to burns.
• Keep the iron away from children, and when it is turned on, keep the unit under supervision.
• Disconnect the plug when leaving the room where you are ironing, even if it is only briefly.
• Never iron or dampen clothes while wearing them.
• During ironing pauses, always place the iron upright in its heel rest.
• Never immerse the iron in water or other liquids.
• The cord should never come into contact with hot objects or the sole plate.
• Check the cord periodically for possible damage.
• Do not use a damaged iron.
• Take it to a Braun Service Center for repair.
• Braun electric appliances meet applicable safety standards.
• This appliance can only be opened by an authorised Braun Service Centre for repairs.
• The cord of this appliance may only be replaced by an authorised Braun Service Centre since
special tools are required.
• Faulty, unqualified repair work may cause accidents or injury to the user.
• Make sure your voltage corresponds to that printed on the iron. Connect the iron to an alternating
current (~) outlet only.
Table of features for each model
Feature: Model: PV 2202 PV 2205 PV 2210 PV 2212
Jet of steam
● ● ● ●
Shot of steam
● ●
Extra steam
● ●
Spray
● ● ● ●
Specifications
Voltage/wattage: See typeplate at the
bottom of the unit.
Water tank capacity: 215 cc (approximately
1 filling beaker
q
of water filled up to the
mark = 1 tank filling).
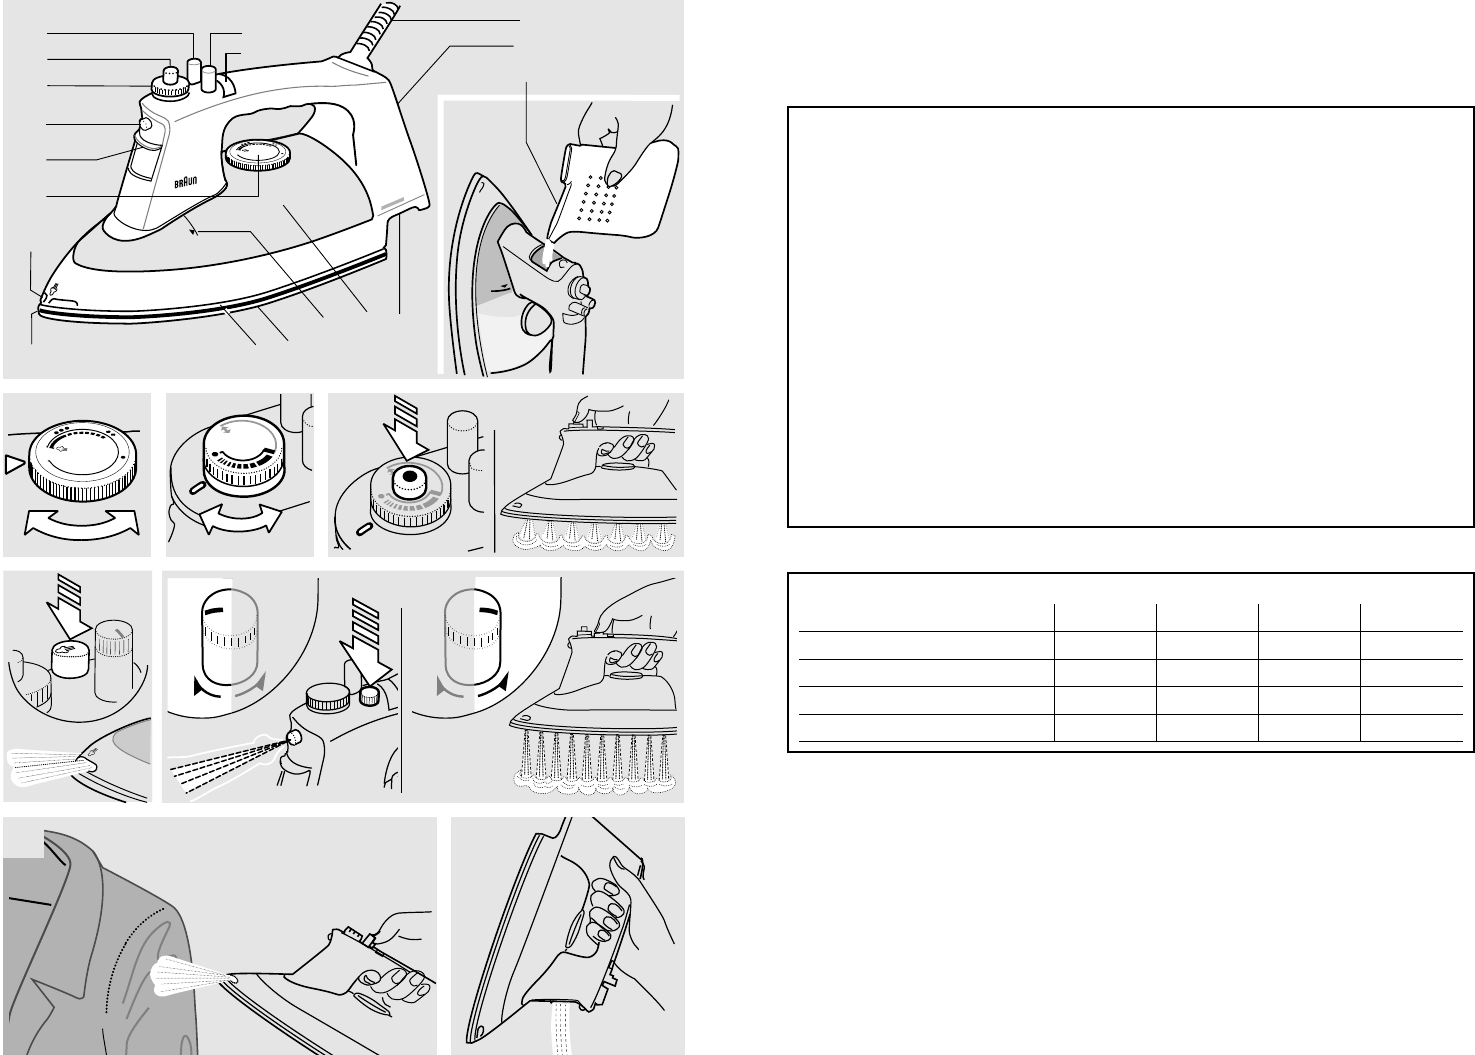
Description
1
Temperature selector
2
Water tank with sliding shutter opening
3
Water spray nozzle
4
Steam regulator / self-cleaning activator
and anti-calc. valve
5
Extra steam button
6
Jet of steam button
7
1- or 2-function button (water-spray/
shot of steam, see «Table of features»)
8
Pilot light
9
Pivoting cord
j
Heel rest
k
Cord storage/typeplate
l
Transparent water tank
L
Maximum marking («max.»)
m
Sole plate with 71 steam vents
n
Full-lenght button groove
o
Slim pointed tip
p
Jet of steam outlet
q
Filling beaker
proglide-jet
jet
jet
-jet
max
jet
max
min
sc
jet
max
min
sc
shot
spray
shot
spray
jet
shot
s
e
l
f
c
l
e
a
n
i
n
g
s
e
l
f
c
l
e
a
n
i
n
g
2
3
4
5
7
8
11
9
10
17
12
1
16
15
14
b
e
g h
f
c d
a
6
13
12a