


93
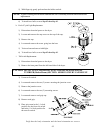
b. Retaining Wheel(s) Replacement
1) Discontinue electrical power to the dryer.
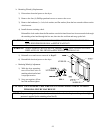
2) Remove the four (4) Phillips pan head screws to remove the cover.
3) Remove the hardware (i.e., bolt, lock washer, and flat washer) from the hex nut and weld nut on the
wheel mount.
4) Install the new retaining wheel.
Reinstall the lock washer then the flat washer onto the bolt and insert into lower mount hole through
the retaining wheel and through the hex nut, then into the weld nut and snug up the bolt.
WARNING: ALL SERVICE and TROUBLESHOOTING SHOULD BE PERFORMED BY A
QUALIFIED PROFESSIONAL or SERVICE AGENCY.
WARNING: WHILE MAKING ADJUSTMENTS, OBSERVE ALL SAFETY PRECAUTIONS
DISPLAYED ON THE DRYER or SPECIFIED IN THIS MANUAL.
5) Reinstall cover and screws removed in Step #2.
6) Reestablish electrical power to the dryer.
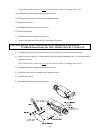
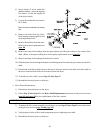
c. Retaining Wheel(s) Adjustment
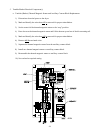
1) With the dryer operating,
turn off-set hex hub on
retaining wheel until wheel
is at proper tension.
2) Snug nut against off-set
hex hub and then tighten.
CAUTION: USE EXTREME CARE WHEN SETTING RETAINING WHEEL TENSION.
PERSONAL INJURY MAY RESULT.
NOTE: Proper retaining wheel tension has been achieved when the wheel spins and stops when slight
pressure is applied (to the retaining wheel itself).