


89
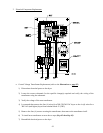
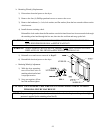
2) Loosen turnbuckle and remove V-belts.
3) Install new V-belts.
NOTE: Replace V-belts in matched sets (both belts).
4) Tighten turnbuckle.
IMPORTANT: DO NOT OVERTIGHTEN TURNBUCKLE.
5) Reestablish electrical power the dryer.
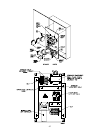
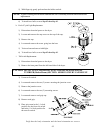
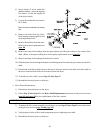
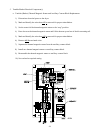
c. Taper Bushing and Drive Motor Pulley Replacement
1) Discontinue electrical power to the dryer.
2) Loosen turnbuckle and remove V-belts.
3) Mark inside of the drive motor shaft.
4) Remove the bolts securing the taper bushing.
5) Insert bolts into the threaded holes on the motor pulley and tighten evenly for pulley removal.
6) Loosen the set screws on the taper bushing and remove the bushing.
7) Measure the mark on the drive motor shaft to the end of the shaft.
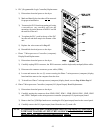
8) Install the new drive motor pulley.
9) Align the new taper bushing with the mark on the shaft and install by tightening the set screws.
10) Insert bolts into the holes on the taper bushing and thread in to the motor pulley and tighten evenly.
11) Check that the pulley is in proper alignment.
a) Reinstall V-belts and tighten turnbuckle.
IMPORTANT: DO NOT OVERTIGHTEN TURNBUCKLE.
12) Reestablish electrical power to the dryer.
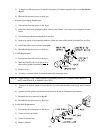
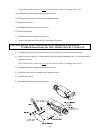
d. Drive Shaft Replacement
1) Discontinue electrical power to the dryer.
2) Remove the side panel and guard from the dryer covering the drive wheels.
3) Mark the position of the pillow block bearing on the mounting pad and loosen the set screws.