


63
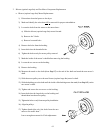
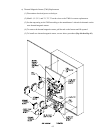
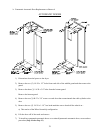
d) Loosen the set screws on the bushing.
e) Remove the bushing and the pulley.
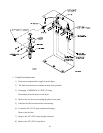
11) Remove the pillow block bearing with shroud by removing the set screw.
12) Replace the pillow block bearing with shroud on to the fan shaft...
a) Secure the fan (blower) shaft bearing mount assembly.
b) Tighten and secure the set screws in the pillow block bearing with shroud.
NOTE: Make certain that the squirrel cage fan (impellor/blower) can spin freely.
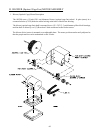
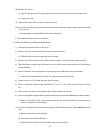
13) Reinstall the bushing and the pulley.
a) Line up the bushing to the mark on the motor shaft and tighten and secure the set screw.
b) Reinstall the bolts into the original holes and tighten evenly for correct pulley installation.
14) Reposition the blower (squirrel cage fan) motor to its original position...
a) Tighten (hand tight only) the bolts into the motor and the motor base.
b) Slide the blower (squirrel cage fan) motor forward.
Align the pulleys before installing the V-belts.
IMPORTANT: DO NOT OVERTIGHTEN V-BELTS.
15) When V-belts are properly tensioned, tighten and secure the motor to the motor base.
16) Reestablish electrical power to the dryer.
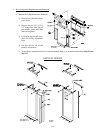
c. Squirrel Cage Fan (impellor) Replacement
1) Discontinue electrical power to the dryer.
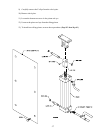
2) Remove the bolts securing the blower (squirrel cage fan) motor.
3) Remove the V-belts.
4) Slide the blower (squirrel cage fan) motor to the side.
5) Remove the bolts from the blower (squirrel cage fan) shaft bearing mount assembly.
a) Slide the blower (squirrel cage fan) shaft bearing mount assembly backwards.
6) Remove the two (2) left hand jam nuts and the washer.